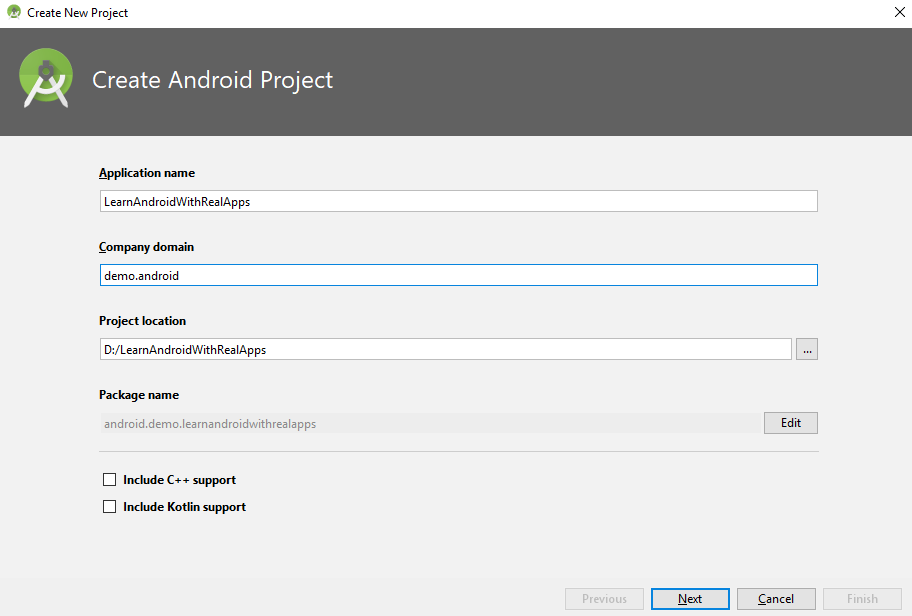
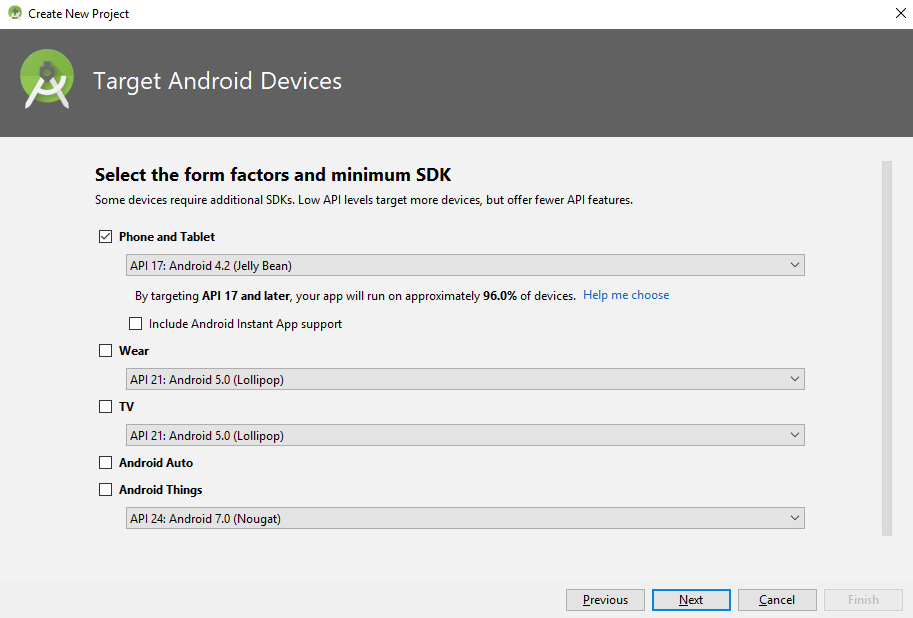
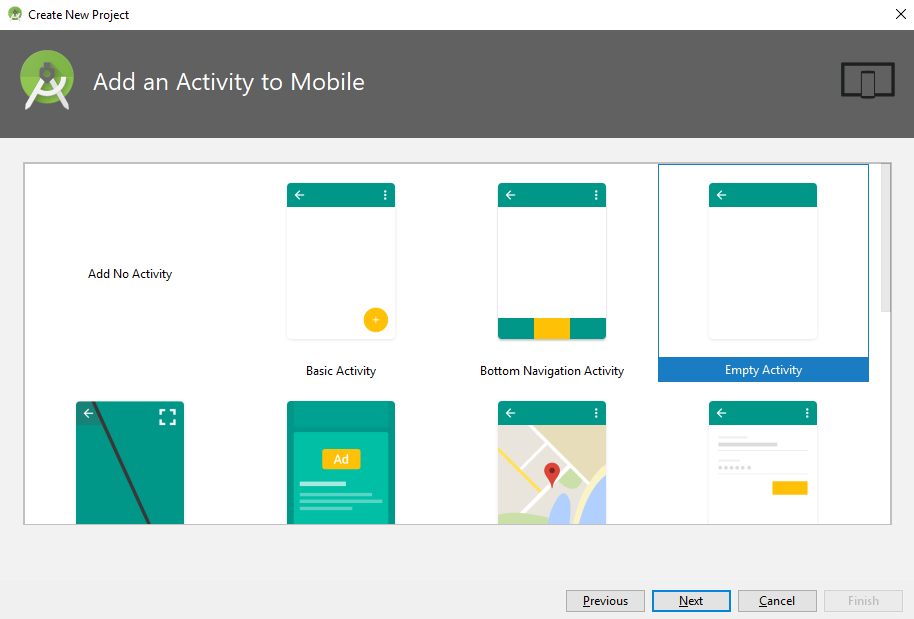
Create Project
Create new project in Android Studio with steps as below:
Step 1: Input Project Name and Select Project Location
Step 2: Select SDK for Android App
Step 3: Select Default Activity for App
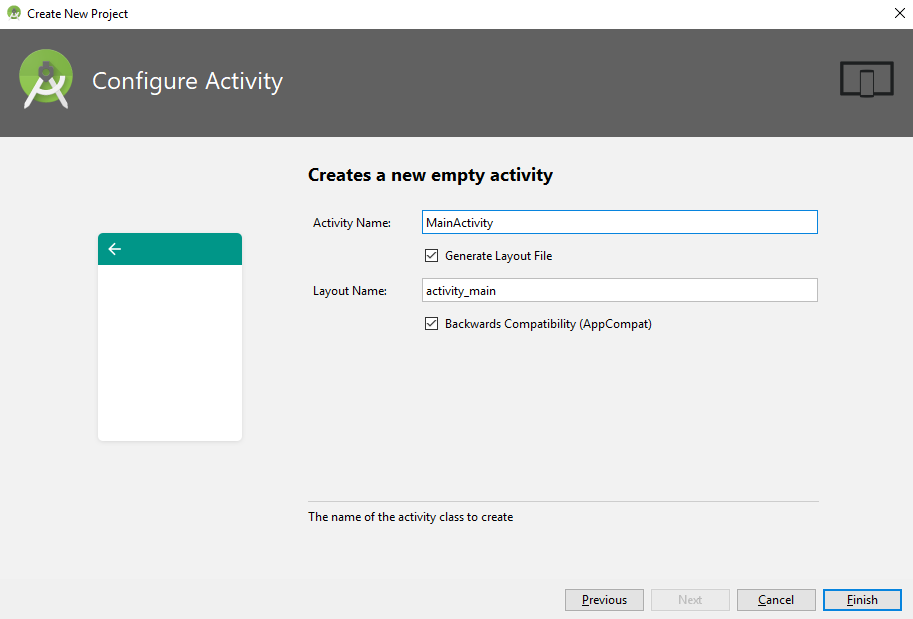
Step 4: Finish create project
Add Strings
Open res\values\strings.xml file and add new string as below:
<resources>
    <string name="app_name">Learn Android with Real Apps</string>
    <string name="search_product">Search Product...</string>
</resources>
Add Photos
Copy images to res\drawable folder
Create Entities
Create new package named entities. In this package, create new java class named Product.java as below:
package android.demo.entities;

import java.io.Serializable;

public class Product implements Serializable {

    private String id;

    private String name;

    private double price;

    private String description;

    private int photo;

    public String getId() {
        return this.id;
    }

    public void setId(String id) {
        this.id = id;
    }

    public String getName() {
        return this.name;
    }

    public void setName(String name) {
        this.name = name;
    }

    public double getPrice() {
        return this.price;
    }

    public void setPrice(double price) {
        this.price = price;
    }

    public String getDescription() {
        return this.description;
    }

    public void setDescription(String description) {
        this.description = description;
    }

    public int getPhoto() {
        return this.photo;
    }

    public void setPhoto(int photo) {
        this.photo = photo;
    }

    public Product() {
    }

    public Product(String id, String name, double price, String description, int photo) {
        this.id = id;
        this.name = name;
        this.price = price;
        this.description = description;
        this.photo = photo;
    }
}
Create Models
Create new package named models. In this package, create new java class named ProductModel.java as below:
package android.demo.models;

import android.demo.entities.Product;
import android.demo.learnandroidwithrealapps.R;
import java.util.ArrayList;
import java.util.List;

public class ProductModel {

    private List<Product> products;

    public ProductModel() {
        this.products = new ArrayList<Product>();
        products.add(new Product("p01", "Laptop 1", 4, "Description for Product 1", R.drawable.thumb1));
        products.add(new Product("p02", "Laptop 2", 8, "Description for Product 2", R.drawable.thumb2));
        products.add(new Product("p03", "Computer 1", 9, "Description for Product 3", R.drawable.thumb3));
        products.add(new Product("p04", "Computer 2", 11, "Description for Product 4", R.drawable.thumb1));
        products.add(new Product("p05", "Mobile 1", 5, "Description for Product 5", R.drawable.thumb2));
        products.add(new Product("p06", "Mobile 2", 21, "Description for Product 6", R.drawable.thumb3));
    }

    public List<Product> getProducts() {
        return this.products;
    }

}
Create Custom MultiAutoCompleteTextView Layout
Select res\layout folder. In this folder, create new layout named multiautocomplete_custom_layout.xml as below:
<?xml version="1.0" encoding="utf-8"?>
<LinearLayout xmlns:android="http://schemas.android.com/apk/res/android"
    xmlns:app="http://schemas.android.com/apk/res-auto"
    android:layout_width="match_parent"
    android:layout_height="match_parent">

    <ImageView
        android:id="@+id/imageViewPhoto"
        android:layout_width="wrap_content"
        android:layout_height="67dp"
        app:srcCompat="@drawable/thumb1" />

    <TextView
        android:id="@+id/textViewName"
        android:layout_width="wrap_content"
        android:layout_height="wrap_content"
        android:layout_weight="1" />

</LinearLayout>
Create Custom Adapter
Create new package named adapters. In this package, create new java class named ProductListAdapter.java as below:
package android.demo.adapters;

import android.content.Context;
import android.demo.entities.Product;
import android.demo.learnandroidwithrealapps.R;
import android.view.LayoutInflater;
import android.view.View;
import android.view.ViewGroup;
import android.widget.ArrayAdapter;
import android.widget.Filter;
import android.widget.ImageView;
import android.widget.TextView;

import java.util.ArrayList;
import java.util.List;

public class ProductListAdapter extends ArrayAdapter<Product> {

    private List<Product> products, tempProducts, suggestions;
    private Context context;

    public ProductListAdapter(Context context, List<Product> products) {
        super(context, R.layout.multiautocomplete_custom_layout, products);
        this.context = context;
        this.products = products;
        tempProducts = new ArrayList<Product>(products);
        suggestions = new ArrayList<Product>();
    }

    @Override
    public View getView(int position, View convertView, ViewGroup parent) {
        View view = LayoutInflater.from(context).inflate(R.layout.multiautocomplete_custom_layout, null);
        Product product = products.get(position);
        if (product != null) {
            TextView textViewName = view.findViewById(R.id.textViewName);
            textViewName.setText(product.getName());
            ImageView imageViewPhoto = view.findViewById(R.id.imageViewPhoto);
            imageViewPhoto.setImageResource(product.getPhoto());
        }
        return view;
    }


    @Override
    public Filter getFilter() {
        return new Filter() {

            @Override
            public CharSequence convertResultToString(Object resultValue) {
                Product product = (Product) resultValue;
                return product.getName();
            }

            @Override
            protected FilterResults performFiltering(CharSequence charSequence) {
                if (charSequence != null) {
                    suggestions.clear();
                    for (Product product : tempProducts) {
                        if (product.getName().toLowerCase().contains(charSequence.toString().toLowerCase())) {
                            suggestions.add(product);
                        }
                    }
                    FilterResults filterResults = new FilterResults();
                    filterResults.values = suggestions;
                    filterResults.count = suggestions.size();
                    return filterResults;
                } else {
                    return new FilterResults();
                }
            }

            @Override
            protected void publishResults(CharSequence charSequence, FilterResults filterResults) {
                List<Product> filterList = (ArrayList<Product>) filterResults.values;
                if (filterResults != null && filterResults.count > 0) {
                    clear();
                    for (Product product : filterList) {
                        add(product);
                        notifyDataSetChanged();
                    }
                }
            }
        };
    }

}
Main Activity Layout
Open res\layout\activity_main.xml file and create layout as below:
<?xml version="1.0" encoding="utf-8"?>
<LinearLayout xmlns:android="http://schemas.android.com/apk/res/android"
    xmlns:app="http://schemas.android.com/apk/res-auto"
    xmlns:tools="http://schemas.android.com/tools"
    android:layout_width="match_parent"
    android:layout_height="match_parent"
    android:orientation="vertical"
    tools:context=".MainActivity">

    <MultiAutoCompleteTextView
        android:id="@+id/multiAutoCompleteTextViewProductSearch"
        android:layout_width="match_parent"
        android:layout_height="wrap_content" />

</LinearLayout>
Main Activity Class
Add code to MainActivity.java file in android.demo.learnandroidwithrealapps package as below:
package android.demo.learnandroidwithrealapps;

import android.demo.adapters.ProductListAdapter;
import android.demo.models.ProductModel;
import android.os.Bundle;
import android.support.v7.app.AppCompatActivity;
import android.view.View;
import android.widget.AdapterView;
import android.widget.MultiAutoCompleteTextView;
import android.widget.TextView;
import android.widget.Toast;

public class MainActivity extends AppCompatActivity {

    private MultiAutoCompleteTextView multiAutoCompleteTextViewProductSearch;

    @Override
    protected void onCreate(Bundle savedInstanceState) {
        super.onCreate(savedInstanceState);
        setContentView(R.layout.activity_main);
        initView();
        loadData();
    }

    private void initView() {
        multiAutoCompleteTextViewProductSearch = findViewById(R.id.multiAutoCompleteTextViewProductSearch);
    }

    private void loadData() {
        ProductModel productModel = new ProductModel();
        multiAutoCompleteTextViewProductSearch.setThreshold(1);
        multiAutoCompleteTextViewProductSearch.setTokenizer(new MultiAutoCompleteTextView.CommaTokenizer());
        multiAutoCompleteTextViewProductSearch.setHint(getText(R.string.search_product));
        multiAutoCompleteTextViewProductSearch.setAdapter(new ProductListAdapter(getApplicationContext(), productModel.getProducts()));
        multiAutoCompleteTextViewProductSearch.setOnItemClickListener(new AdapterView.OnItemClickListener() {
            @Override
            public void onItemClick(AdapterView<?> adapterView, View view, int i, long l) {
                multiAutoCompleteTextViewProductSearch_onItemClick(adapterView, view, i, l);
            }
        });
    }

    private void multiAutoCompleteTextViewProductSearch_onItemClick(AdapterView<?> adapterView, View view, int i, long l) {
        TextView textViewName = view.findViewById(R.id.textViewName);
        Toast.makeText(getApplicationContext(), textViewName.getText().toString(), Toast.LENGTH_SHORT).show();
    }

}
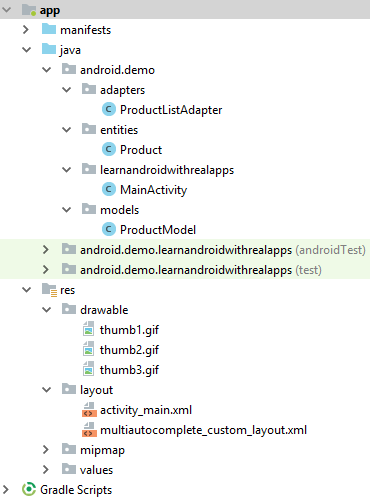
Structure of Project
Run App
Load MultiAutoCompleteTextView

Search Product with lap Keyword
Search Product with com Keyword
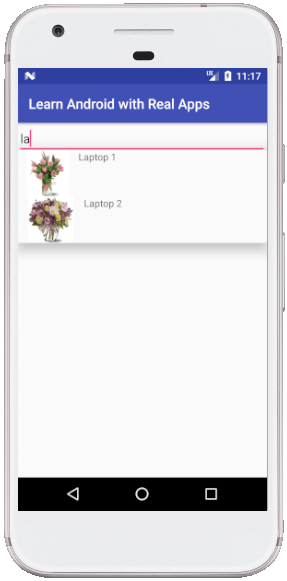
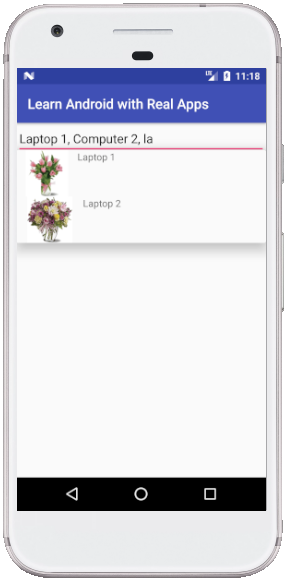
Search Product with la Keyword
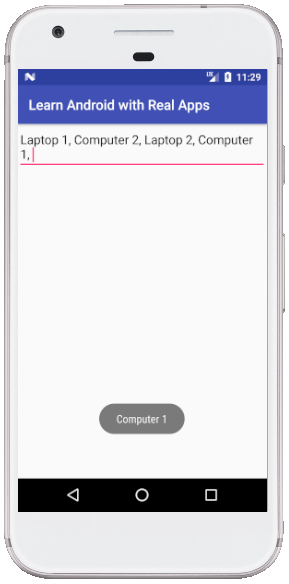
MultiAutoCompleteTextView with All Keywords

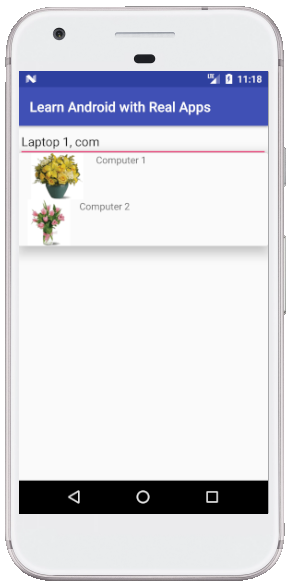
Use ItemClick Event of MultiAutoCompleteTextView